This month I was able to get https://blog.aaronlenoir.com up and running.
This means I got:
- a domain name (aaronlenoir.com);
- an easier URL for my blog (it used to be https://blog-aaronlenoir.rhcloud.com);
- an SSL Certificate
My main motivation was that if I need to move my blog to some other hosting, the old URL's will still work. I'd just point the domain to another host.
With the rhcloud.com URL, this would not be possible.
I'm still hosting this blog on RedHat's OpenShift using Ghost. Setting it all up was interesting. So here's what needed to be done.
Getting a domain name
I never bought a domain name, so I was unsure what would be involved.
I really wanted aaronlenoir.be but that was already taken.
At first I looked at dnsimple, because I heard a lot of good thing about them. But I'd probably not need most of their services. They would be a better fit if you need to manage more domains. I just needed one domain name.
Then I looked at both GoDaddy and Namecheap. In general, I read more postive things about Namecheap than GoDaddy. From what I understand, GoDaddy is really cheap but they charge extra for almost any additional feature.
I went with Namecheap and bought aaronlenoir.com for $20 for two years. This includes a 1 year WhoisGuard subscription. WhoisGuard ensure that when you look up my domain information, you don't see my personal details.
That was really all there was to it.
Point the Domain to the blog
When you get a domain, you can create a number of sub-domains (for example blog.aaronlenoir.com).
Since I already had hosting, it was a matter of pointing blog.aaronlenoir.com to blog-aaronlenoir.rhcloud.com).

Then in the OpenShift Web Console, open the app, click on "change alias" and add the domain.
It takes a while for this change to have effect. After about half an hour I was able to visit my blog from the domain.
Fixing Ghost redirect
When I visited: http://blog.aaronlenoir.com I was always redirected to https://blog-aaronlenoir.rhcloud.com/
The reason for this was the configuration of the blog (Ghost). In the config file, I had to hard-code the domain name, instead of using the OpenShift environment variable. In config.js change
url: 'https://'+process.env.OPENSHIFT_APP_DNS,
to
url: 'https://blog.aaronlenoir.com',
I could've added some environment variables, but it's fine.
Applying Https
So that is step 1, and it works when I use "http". But I want to go for HTTPS.
This used to be a pain, but now this should be quite easy to do, for no money.
Getting a Certificate
Let's Encrypt!
The first thing to do is getting a certificate. Traditionally, you'd had to purchase one from a Certificate Authority.
Luckily, now there is "Let's Encrypt" (support them!). They provide free certificates and potentially automatically renew them.
The main concept is that if you can prove you own the domain then you get a certificate. This can be proven by uploading a specific file to the domain. Let's encrypt the checks from their end that the file is available and then provides you with a certificate.
If you have root or adminstrator access to the server, this can be fully automated. In my case, on OpenShift, I do not have this and I cannot run the automatic tools.
So I had to perform this manually.
Getting a Certificate on OpenShift Manually
To use Let's Encrypt I must be able to upload a specific file to the following location:
There are some problems:
- I need that folder somewhere in my OpenShift Gear
- By default, Ghost won't serve files from that directory.
Getting the acme-challenge folder on OpenShift
Cloning my gear repo from OpenShift, the file .openshift/action_hooks/deploy can be edited to ensure the required folders are present. The following needs to be added to the script:
if [ ! -d "$OPENSHIFT_DATA_DIR/.well-known" ]; then
        mkdir -p $OPENSHIFT_DATA_DIR/.well-known
fi
if [ ! -d "$OPENSHIFT_DATA_DIR/.well-known/acme-challenge" ]; then
        mkdir -p "$OPENSHIFT_DATA_DIR/.well-known/acme-challenge"
fi
echo "Symlinking Lets Encrypt dir."
rm -rf $OPENSHIFT_REPO_DIR/.well-known
ln -sf $OPENSHIFT_DATA_DIR/.well-known $OPENSHIFT_REPO_DIR/.well-known
Now this script will run every time I deploy an update to the Gear.
Uploading files to the Data Dir
This can be done through an scp command. For example:
scp SomeFileName.txt 337a20c29d20405197d0fac456d60dc4@blog-aaronlenoir.rhcloud.com:/var/lib/openshift/337a20c29d20405197d0fac456d60dc4/app-root/data/.well-known/acme-challenge
Making Ghost host the acme-challenge folder
For this, I had to do a dirty trick. Hopefully there is a solution in later versions of Ghost.
First I added a setting to the .config file, to the "paths":
paths: {
    contentPath: path.join(__dirname, '/content/'),
    acmeChallenge: path.join(__dirname, '/.well-known/acme-challenge')
}
I added the acmeChallenge setting.
Secondly, I have to tell Ghost it's ok to serve this folder as static files. This is currently done in the Ghost code itself. This is really annoying, because updating Ghost will probably break this.
In node_modules/ghost/core/server/middleware/index.js add a line:
blogApp.use('/.well-known/acme-challenge', express['static'](config.paths.acmeChallenge, {maxAge: utils.ONE_YEAR_MS}));
Running the Let's Encrypt client
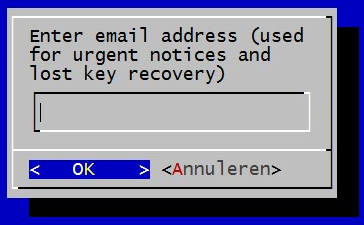
In my case, I can't run the Let's Encrypt client on my actual webserver. So I'll have to run it on a local machine. Apart from that, it's very straight forward:
git clone https://github.com/letsencrypt/letsencryptcd letsencrypt./letsencrypt-auto -a manual -d blog.aaronlenoir.com
From that point, it's a matter of following the instructions on the screen, until it asks you to upload the file to the server.
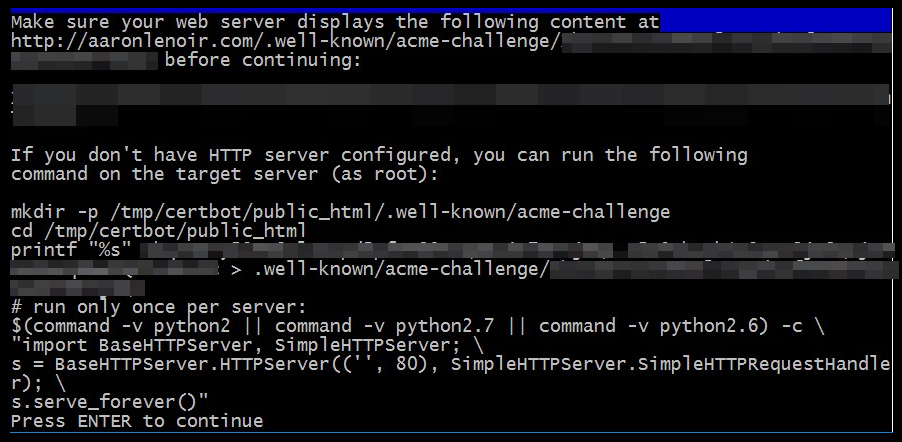
Then, the requested file can be uploaded using the command shown before (but then with the correct file):
scp SomeFileName.txt 337a20c29d20405197d0fac456d60dc4@blog-aaronlenoir.rhcloud.com:/var/lib/openshift/337a20c29d20405197d0fac456d60dc4/app-root/data/.well-known/acme-challenge
After ensuring the file is accesible the following appeared:
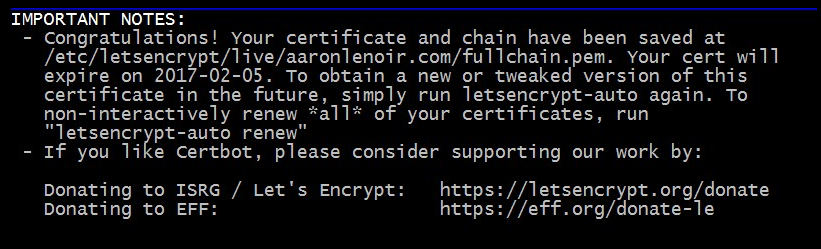
So the certificates are ready in /etc/letsencrypt/live/aaronlenoir.com
They are valid for three months. So every three months (or a bit earlier), I'll have to redo this process.
Again, this could be fully automated in many cases.
Installing the Certificate
In OpenShift's web management console, you go to the app and choose "change alias" again and upload a certificate:
- fullchain.pem for "SSL Certificate"
- privkey.pem for "Certificate Private Key"
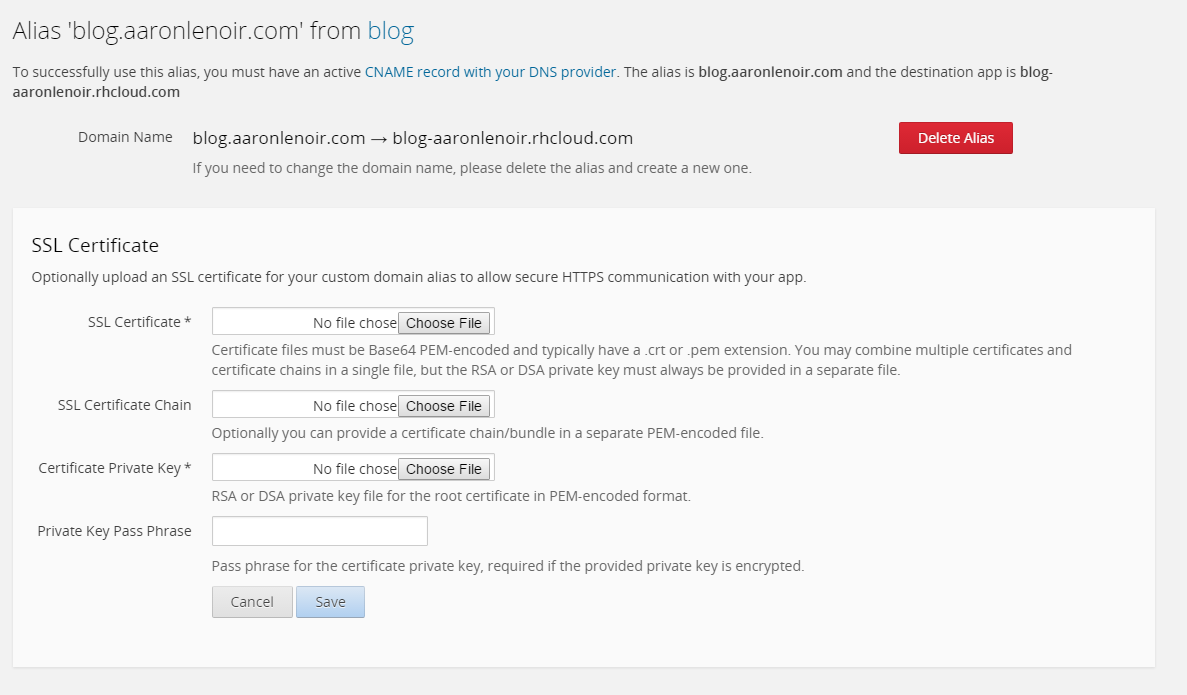
And click Save.
The result is that I was able to visit https://blog.aaronlenoir.com and not get certificate warnings.
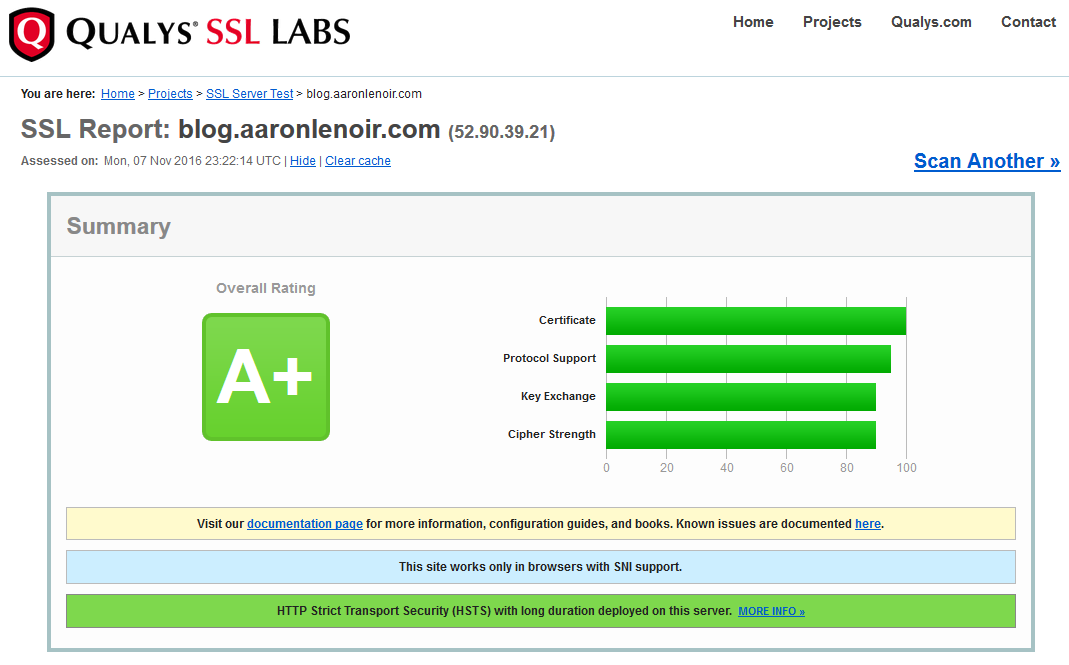
SSL Labs Results
Running this through SSL Labs was encouraging:
Renewing the Certificate
So after three months, the certificate expires. Because OpenShift doesn't support renewing the certificates automatically, I have to do this myself every time.
It is the same:
- Run Let's Encrypt:
./letsencrypt-auto -a manual certonly -d blog.aaronlenoir.com - Upload the requested file using scp
- Upload fullchain.pem as "SSL Certificate" and privkey.pem as "Certificate Private Key"
Since last time, the letsenrypt client does complain if you don't pass "certonly" too.
Conclusion
Because I choose to self-host my blog, I'm forced to do some fiddling. But in general, the process was a lot less painful and cheaper than I imagined. Even if I have to get the Let's Encrypt certificates manually.
Now I'm set for the future, if I ever choose to move my hosting elsewhere.
I must urgently update to a higher version of Ghost, but that's going to be a lot more painful I think.
